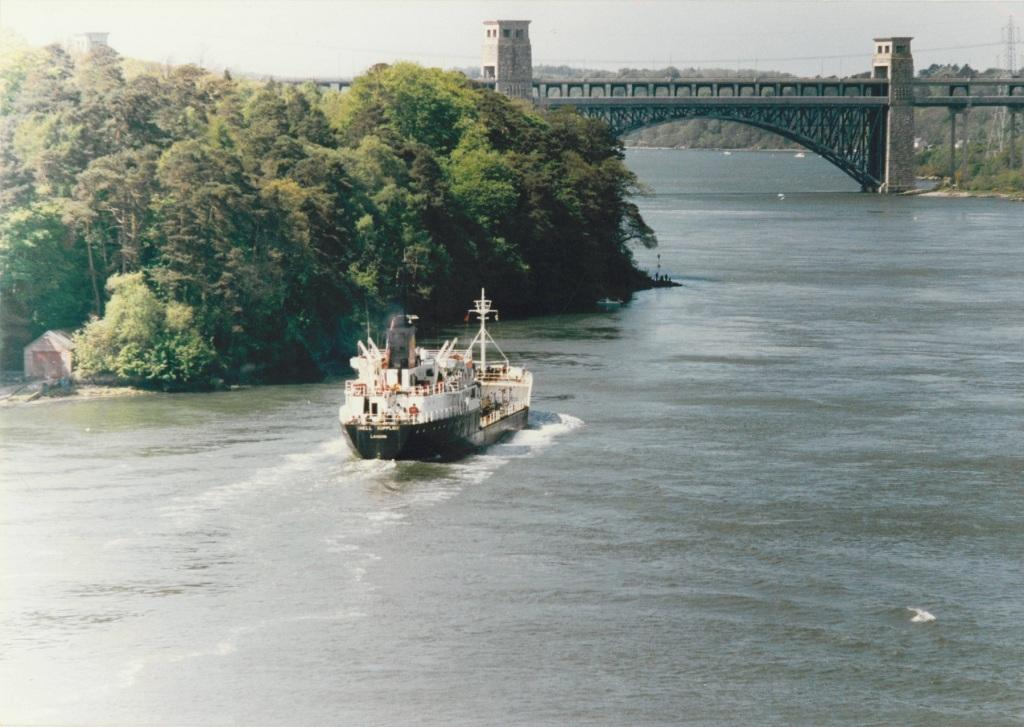
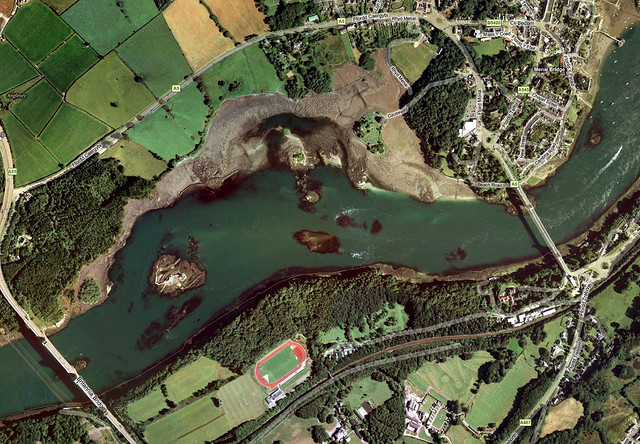
Passage through the Swellies is not as difficult as many boat owners think; as long as you go through at the right time you will wonder what all the fuss is about. However, this stretch of water should always be treated with respect for the dangers involved , many experienced local skippers have been caught out by complacency. Due to the strength of the tidal stream in the Swellies (up to 8 knots on springs and 5 knots on neaps) vessels normally only go through at or near Slack Water. High Water Slack (HWS) at the Swellies is about 2 hrs before High Water Liverpool (the time of Slack Water can be affected by weather conditions – a strong wind between Southeast and West will make the slack later, and a strong wind between Northwest and East (through North) will make it sooner). It is far better to work off High Water Liverpool than the High Water time of the nearest primary port (Holyhead) as the time difference to Liverpool remains fairly constant whether it is springs or neaps. Always observe what the tidal stream is doing when approaching the Swellies – you may have miscalculated the time, or weather conditions could be affecting the tide. It would not be prudent to go through when the stream is running very strongly as you could be swept through out of control if a fault developed with your engine or steering gear.
EASTWARD PASSAGE
Timing
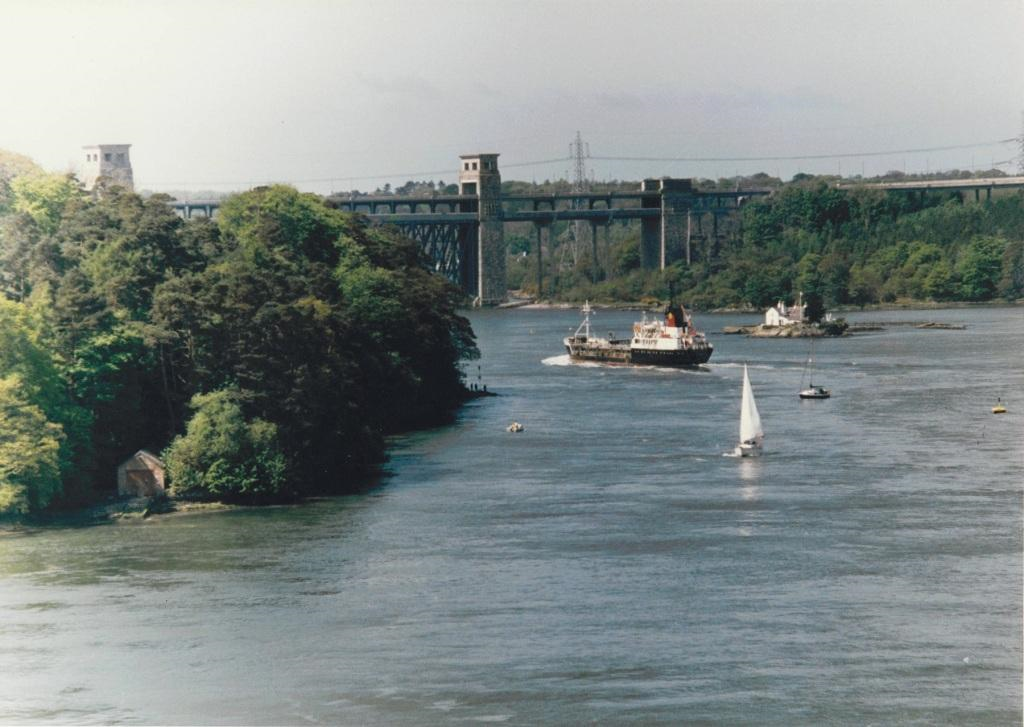
When making a passage eastward through the Swellies it is best to arrive early (Liverpool -2 hrs 30 mins), and carry the last of the east-going tide with you, the rate of flow can be judged as you are approaching the Britannia Bridge and entry can be delayed if the flood tide is still running too strongly. If you arrive after Slack Water then you might not make it through before the West-going stream commences (the West-going stream gathers speed quickly after the Slack, accelerating at the rate of almost 1 knot every 10 mins on springs – this is because the level starts falling in Caernarfon Bay whilst it is still rising in the N.E. end of the Strait for another 75 minutes).
Sailing Directions
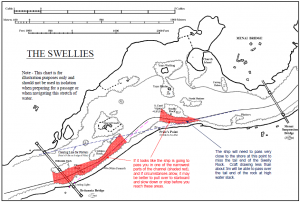
Approach the South arch of the Britannia Bridge keeping the white pyramid (1½ cables East of the centre pillar of the bridge) in line with the centre of the arch. Pass under the centre of the arch (clearance is 90 feet / 27.4 metres at MHWS).
Head for a point midway between the white pyramid and Price’s Point. Note – if there is any tide running then you will need to adjust this course accordingly – heading more for the pyramid when there is a flood tide running, depending on the speed of the tidal stream; and more for Price’s Point when the ebb tide is running, again depending on how strong the tidal stream is. When the pyramid is abeam you should then be on the transit given by the leading lights (two small lattice towers situated on the shore under the South side arch of the Britannia Bridge).
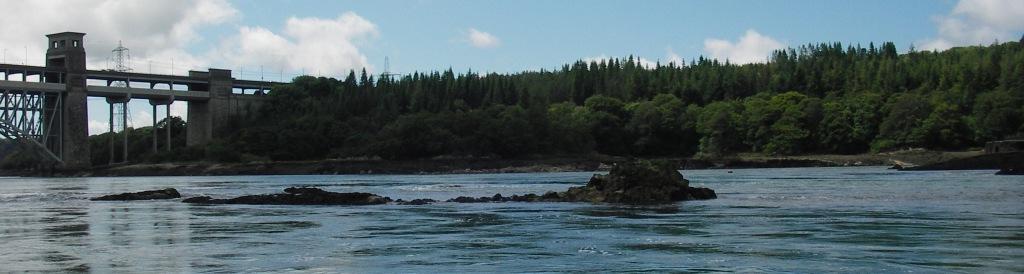
The narrowest part of the channel in the Swellies is about 100 feet wide (30 metres) and is situated between the Cribbin Rock and the pyramid on the shore. At this point you will be passing quite close to the shore.
Once on the transit, keep the leading marks in line until Price’s Point Beacon is just ahead of the beam, then alter course to starboard so that you pass to the South of the Swelly Rock Perch (S. Cardinal) – distance off the Perch of about 20 to 30 metres. After passing the Swelly Rock Perch, head in for the point ahead (1½ cables East of Price’s Point) keeping close in to the shore to clear the tail end of the Swelly Rock (It is not critical that you pass close to the shore at High Water Slack, unless you have a draft of more than about 3 metres, as you will pass over the tail end of the rock).
Once past the point alter course so that you are heading just South of the Anglesey pillar of the Menai Suspension Bridge (to clear the Platters). There is a clearing line for the Platters – looking aft towards Price’s Point, as long as you can see part of the archway on the North side of the Britannia Bridge open on Price’s Point then you will clear the Platters. After passing the Platters (you will see a house abeam on the shore to starboard) head for the centre of the span of the Menai Suspension Bridge.
WESTWARD PASSAGE
Timing
For passage through at High Water Slack the timing is not as critical for the Westward passage as it is for the Eastward passage as the tide will be running with you after the slack. It does not matter too much if you are early as the flood tide will check your progress. If you are late going through then you will be swept through, which means you will have less control, but is fine as long as your vessel is fairly manoeuvrable and you keep out of the eddies – if late keep just South of the line of the eddy just West of the Menai Suspension Bridge (the eddy is on the Anglesey side) passing close to the Platters, and also keep closer to the shore after passing under the Britannia Bridge to miss the eddies created by the Britannia Rock (which supports the centre pillar of the bridge).
Sailing Directions
Pass under the centre of the span of the Menai Suspension Bridge. Alter course to starboard and head for the Swelly Rock Perch (S. Cardinal) – in order to miss the platters. Once past the Platters steer in for the point 1½ cables East of Price’s Point. Keep close in to the shore passing this point to miss the tail end of the Swelly Rock (it is not critical that you pass close to the shore at High Water Slack, unless you have a draft of more than about 3 metres, as you will pass over the tail end of the rock).
Alter course to starboard to pass about 20 to 30 metres off the Swelly Rock Perch, leaving the perch to starboard (to the South of it).
When Price’s Point beacon is abeam start altering course to port to come onto the transit of the leading lights as you come around the point. Keep the leading lights in transit until you have the white pyramid abeam to port, then alter course to starboard to head for the centre of the South arch of the Britannia Bridge. Pass under the centre of the arch.
The course shown on the chart below is the ‘ideal’ course and it is not necessary to stick religiously to this when going through at High Water Slack with a shallow drafted vessel. The channel is actually quite wide for a small boat at this state of tide (it is 100 feet wide at the narrowest point for a vessel drawing 4.5 metres, and at least 200 feet wide at the narrowest point if your draft is only 1.2m) and in fact there is enough water at HWS to pass over the Swelly Rock and the Platters with a 1.2m draft, even on a neap tide (although this is not recommended!). The highest point on the Cribbin Rock dries about 4.5m and so you do need to keep clear of this part of the rock. If you want to go through at Low Water Slack (LWS) then it is more important to follow the course shown (depending on draft and height of tide). It is advisable to familiarise yourself with the channel with several passages at HWS before considering a passage at LWS. If you calculate that there is insufficient clearance at LWS for you to be comfortable with, on a particular tide, then consider going through at an hour before the slack (about 1½ knots of West-going tidal stream on springs) – which will give you approximately 1.5 metres more water on a mean spring tide and about 0.8 metres more on a mean neap tide.
The Menai Strait – Application of Rule 9 ‘Narrow Channels’.
 Mariners are reminded of the requirement to comply with Rule 9 of the International Regulations for Preventing Collisions at Sea 1972, as amended (COLREGs). This particular rule refers to ‘Narrow Channels’.
Particular attention is drawn to Rule 9(b), which states that a vessel of less than 20 m in length or a sailing vessel shall not impede the passage of a vessel which can safely navigate only within a narrow channel or fairway.
For most merchant ships the buoyed channel throughout the Menai Strait, from Caernarfon Bar to Puffin Island, is considered to be a narrow channel.
Please see the attached extract from the COLREGs, which lists Rule 9 in full. Users of the waterway should ensure that they are acquainted with the requirements of this rule and all other relevant rules contained within the COLREGs.
Also attached is some guidance to small craft on what to do when they meet a ship in the Strait.